基于 Apache Iceberg 的数据湖分析
基于 Apache Iceberg 的数据湖分析
概述
当前教程包含以下内容:
- 使用 Docker Compose 部署对象存储、Apache Spark、Iceberg Catalog 和 StarRocks。
- 向 Iceberg 数据湖导入数据。
- 配置 StarRocks 以访问 Iceberg Catalog。
- 使用 StarRocks 查询数据湖中的数据。
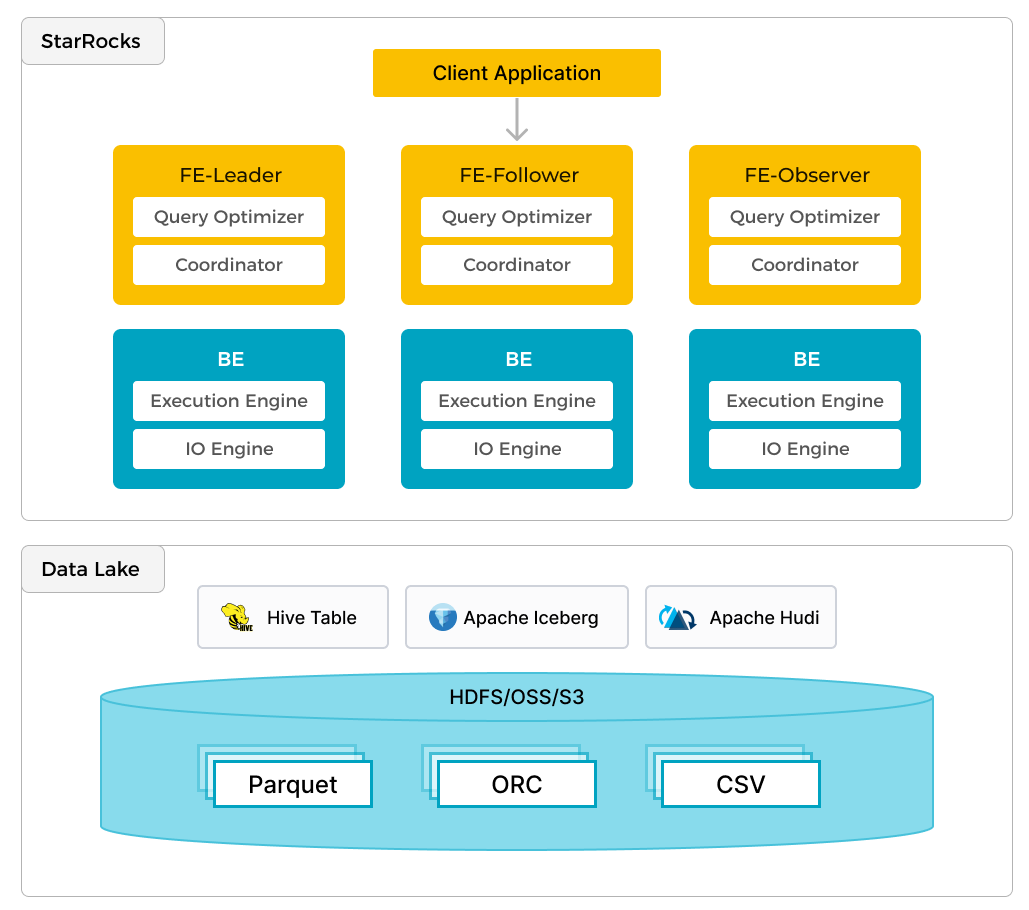
StarRocks 不仅能高效的分析本地存储的数据,也可以作为计算引擎直接分析数据湖中的数据。用户可以通过 StarRocks 提供的 External Catalog,轻松查询存储在 Apache Hive、Apache Iceberg、Apache Hudi、Delta Lake 等数据湖上的数据,无需进行数据迁移。支持的存储系统包括 HDFS、S3、OSS,支持的文件格式包括 Parquet、ORC、CSV。
如上图所示,在数据湖分析场景中,StarRocks 主要负责数据的计算分析,而数据湖则主要负责数据的存储、组织和维护。使用数据湖的优势在于可以使用开放的存储格式和灵活多变的 schema 定义方式,可以让 BI/AI/Adhoc/报表等业务有统一的 single source of truth。而 StarRocks 作为数据湖的计算引擎,可以充分发挥向量化引擎和 CBO 的优势,大大提升了数据湖分析的性能。
前提条件
Docker
- 安装 Docker。
- 为 Docker 分配 5 GB RAM。
- 为 Docker 分配 20 GB 的空闲磁盘空间。
SQL 客户端
您可以使用 Docker 环境中提供的 MySQL Client,也可以使用其他兼容 MySQL 的客户端,包括本教程中涉及的 DBeaver 和 MySQL Workbench。
curl
curl 命令用于下载数据集。您可以通过在终端运行 curl 或 curl.exe 来检查您的操作系统是否已安装 curl。如果未安装 curl,请点击此处获取 curl。
术语
FE
FE 节点负责元数据管理、客户端连接管理、查询计划和查询调度。每个 FE 节点在内存中存储和维护完整的元数据副本,确保每个 FE 都能提供无差别的服务。
CN
CN 节点负责在存算分离或存算一体集群中执行查询。
BE
BE 节点在存算一体集群中负责数据存储和执行查询。使用 External Catalog(例如本教程中使用的 Iceberg Catalog)时,BE 可以用于缓存外部数据,从而达到加速查询的效果。
环境
本教程使用了六个 Docker 容器(服务),均使用 Docker Compose 部署。这些服务及其功能如下:
| 服务 | 功能 |
|---|---|
starrocks-fe | 负责元数据管理、客户端连接、查询规划和调度。 |
starrocks-be | 负责执行查询计划。 |
rest | 提供 Iceberg Catalog(元数据服务)。 |
spark-iceberg | 用于运行 PySpark 的 Apache Spark 环境。 |
mc | MinIO Client 客户端。 |
minio | MinIO 对象存储。 |
下载 Docker Compose 文件和数据集
StarRocks 提供了包含以上必要容器的环境的 Docker Compose 文件和教程中需要使用数据集。
本教程中使用的数据集为纽约市绿色出租车行程记录,为 Parquet 格式。
下载 Docker Compose 文件。
mkdir iceberg
cd iceberg
curl -O https://raw.githubusercontent.com/StarRocks/demo/master/documentation-samples/iceberg/docker-compose.yml
下载数据集。
curl -O https://raw.githubusercontent.com/StarRocks/demo/master/documentation-samples/iceberg/datasets/green_tripdata_2023-05.parquet
在 Docker 中启动环境
所有 docker compose 命令必须从包含 docker-compose.yml 文件的目录中运行。
docker compose up -d
返回:
[+] Building 0.0s (0/0)                     docker:desktop-linux
[+] Running 6/6
 ✔ Container iceberg-rest   Started                         0.0s
 ✔ Container minio          Started                         0.0s
 ✔ Container starrocks-fe   Started                         0.0s
 ✔ Container mc             Started                         0.0s
 ✔ Container spark-iceberg  Started                         0.0s
 ✔ Container starrocks-be   Started
检查环境状态
成功启动后,FE 和 BE 节点大约需要 30 秒才能部署完成。您需要通过 docker compose ps 命令检查服务的运行状态,直到 starrocks-fe 和 starrocks-be 的状态变为 healthy。
docker compose ps
返回:
SERVICE         CREATED         STATUS                   PORTS
rest            4 minutes ago   Up 4 minutes             0.0.0.0:8181->8181/tcp
mc              4 minutes ago   Up 4 minutes
minio           4 minutes ago   Up 4 minutes             0.0.0.0:9000-9001->9000-9001/tcp
spark-iceberg   4 minutes ago   Up 4 minutes             0.0.0.0:8080->8080/tcp, 0.0.0.0:8888->8888/tcp, 0.0.0.0:10000-10001->10000-10001/tcp
starrocks-be    4 minutes ago   Up 4 minutes (healthy)   0.0.0.0:8040->8040/tcp
starrocks-fe    4 minutes ago   Up 4 minutes (healthy)   0.0.0.0:8030->8030/tcp, 0.0.0.0:9020->9020/tcp, 0.0.0.0:9030->9030/tcp
PySpark
本教程使用 PySpark 与 Iceberg 交互。如果您不熟悉 PySpark,您可以参考更多信息部分。
拷贝数据集
在将数据导入至 Iceberg 之前,需要将其拷贝到 spark-iceberg 容器中。
运行以下命令将数据集文件复制到 spark-iceberg 容器中的 /opt/spark/ 路径。
docker compose \
cp green_tripdata_2023-05.parquet spark-iceberg:/opt/spark/
启动 PySpark
运行以下命令连接 spark-iceberg 服务并启动 PySpark。
docker compose exec -it spark-iceberg pyspark
返回:
Welcome to
      ____              __
     / __/__  ___ _____/ /__
    _\ \/ _ \/ _ `/ __/  '_/
   /__ / .__/\_,_/_/ /_/\_\   version 3.5.0
      /_/

Using Python version 3.9.18 (main, Nov  1 2023 11:04:44)
Spark context Web UI available at http://6ad5cb0e6335:4041
Spark context available as 'sc' (master = local[*], app id = local-1701967093057).
SparkSession available as 'spark'.
>>>
导入数据集至 DataFrame 中
DataFrame 是 Spark SQL 的一部分,提供类似于数据库表的数据结构。
您需要从 /opt/spark 路径导入数据集文件至 DataFrame 中,并通过查询其中部分数据检查数据导入是否成功。
在 PySpark Session 运行以下命令:
# 读取数据集文件到名为 `df` 的 DataFrame 中。
df = spark.read.parquet("/opt/spark/green_tripdata_2023-05.parquet")
# 显示数据集文件的 Schema。
df.printSchema()
输出:
root
 |-- VendorID: integer (nullable = true)
 |-- lpep_pickup_datetime: timestamp_ntz (nullable = true)
 |-- lpep_dropoff_datetime: timestamp_ntz (nullable = true)
 |-- store_and_fwd_flag: string (nullable = true)
 |-- RatecodeID: long (nullable = true)
 |-- PULocationID: integer (nullable = true)
 |-- DOLocationID: integer (nullable = true)
 |-- passenger_count: long (nullable = true)
 |-- trip_distance: double (nullable = true)
 |-- fare_amount: double (nullable = true)
 |-- extra: double (nullable = true)
 |-- mta_tax: double (nullable = true)
 |-- tip_amount: double (nullable = true)
 |-- tolls_amount: double (nullable = true)
 |-- ehail_fee: double (nullable = true)
 |-- improvement_surcharge: double (nullable = true)
 |-- total_amount: double (nullable = true)
 |-- payment_type: long (nullable = true)
 |-- trip_type: long (nullable = true)
 |-- congestion_surcharge: double (nullable = true)

>>>
通过查询 DataFrame 中的部分数据验证导入是否成功。
# 检查前三行数据的前七列
df.select(df.columns[:7]).show(3)
+--------+--------------------+---------------------+------------------+----------+------------+------------+
|VendorID|lpep_pickup_datetime|lpep_dropoff_datetime|store_and_fwd_flag|RatecodeID|PULocationID|DOLocationID|
+--------+--------------------+---------------------+------------------+----------+------------+------------+
|       2| 2023-05-01 00:52:10|  2023-05-01 01:05:26|                 N|         1|         244|         213|
|       2| 2023-05-01 00:29:49|  2023-05-01 00:50:11|                 N|         1|          33|         100|
|       2| 2023-05-01 00:25:19|  2023-05-01 00:32:12|                 N|         1|         244|         244|
+--------+--------------------+---------------------+------------------+----------+------------+------------+
only showing top 3 rows
创建 Iceberg 表并导入数据
根据以下信息创建 Iceberg 表并将上一步中的数据导入表中:
- Catalog 名:
demo - 数据库名:
nyc - 表名:
greentaxis
df.writeTo("demo.nyc.greentaxis").create()
在此步骤中创建的 Iceberg 表将在下一步中用于 StarRocks External Catalog。
配置 StarRocks 访问 Iceberg Catalog
现在您可以退出 PySpark,并通过您的 SQL 客户端运行 SQL 命令。
使用 SQL 客户端连接到 StarRocks
SQL 客户端
当前教程可以使用以下三个客户端进行测试,您只需选择其中一个:
- MySQL CLI:您可以从 Docker 环境或您的本机运行此客户端。
- DBeaver(社区版或专业版)
- MySQL Workbench
配置客户端
- mysql CLI
- DBeaver
- MySQL Workbench
您可以从 StarRocks FE 节点容器 starrocks-fe 中直接运行 MySQL Client:
docker compose exec starrocks-fe \
mysql -P 9030 -h 127.0.0.1 -u root --prompt="StarRocks > "
所有 docker compose 命令必须从包含 docker-compose.yml 文件的目录中运行。
如果您需要安装 MySQL Client,请点击展开以下 安装 MySQL 客户端 部分:
安装 MySQL 客户端
- macOS:如果您使用 Homebrew 并且不需要安装 MySQL 服务器,请运行
brew install mysql-client@8.0安装 MySQL Client。 - Linux:请检查您的
mysql客户端的 Repository。例如,运行yum install mariadb。 - Microsoft Windows:安装 MySQL Community Server 后,运行提供的客户端,或在 WSL 中运行
mysql。
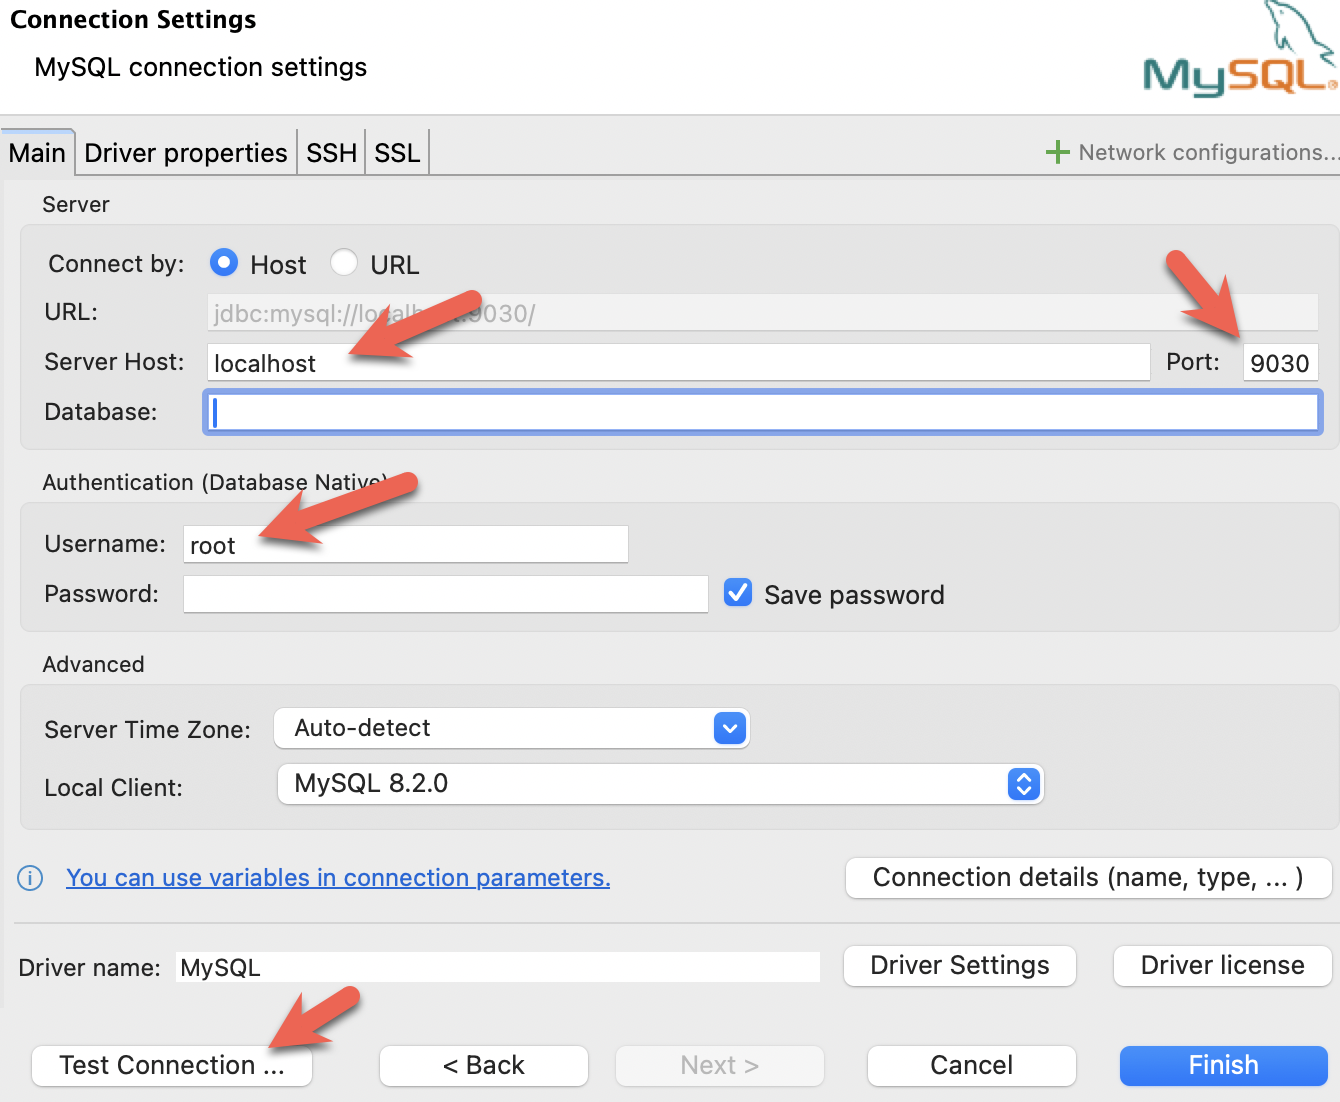
- 安装 DBeaver 并连接 StarRocks。

- 配置端口、IP 地址和用户名,并点击 Test Connection 测试连接。如果测试成功,请点击 Finish 完成配置。
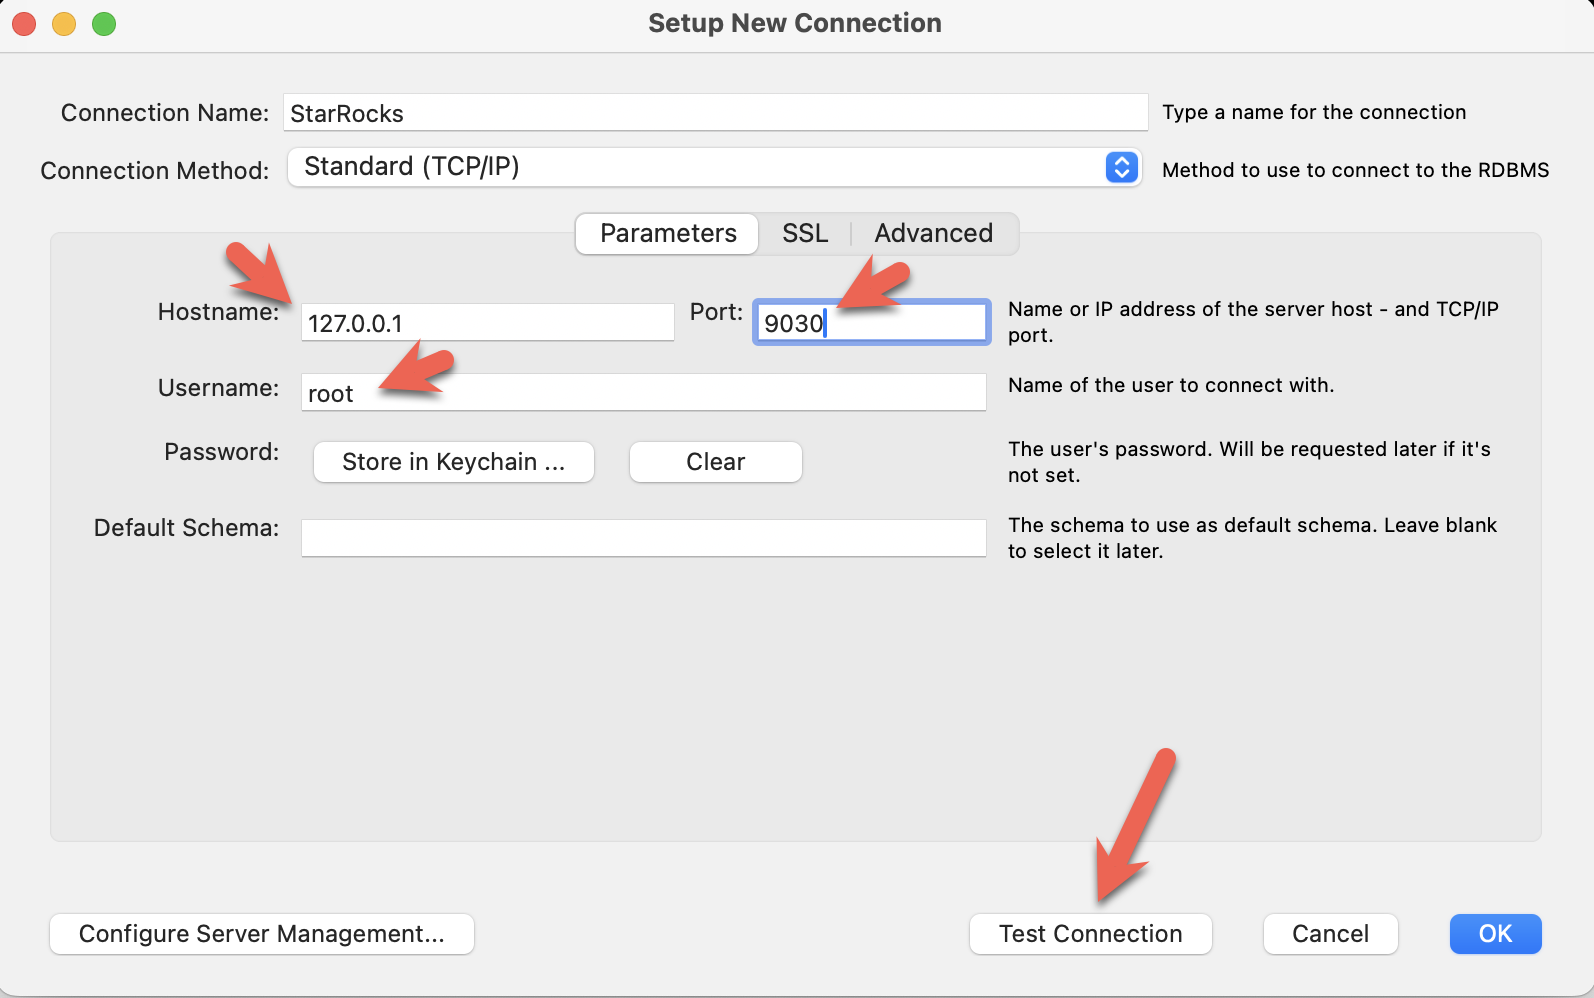
- 安装 MySQL Workbench 并连接 StarRocks。
- 配置端口、IP 地址和用户名,并点击 Test Connection 测试连接。
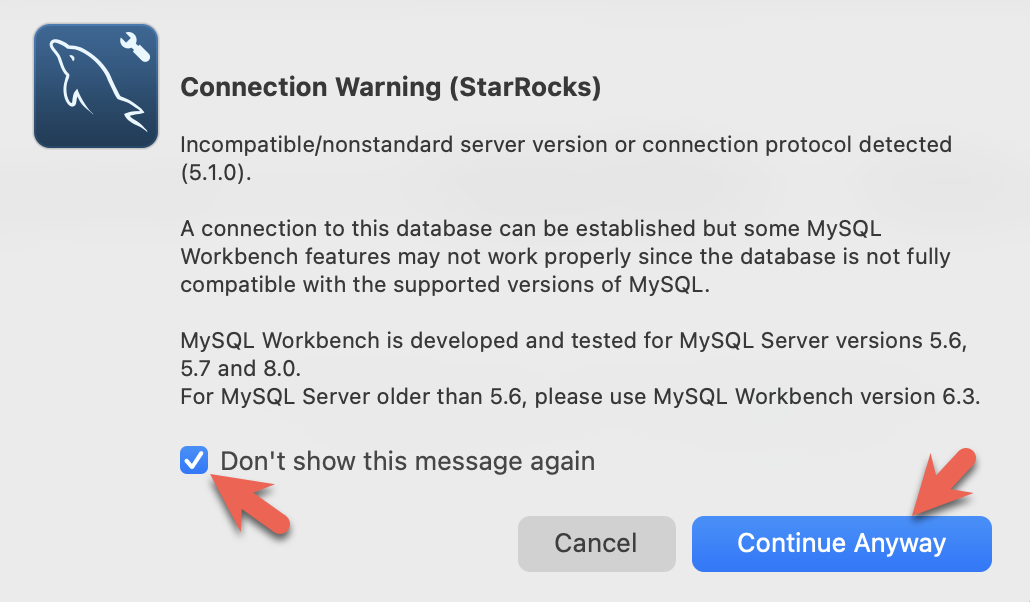
- 在 Workbench 检查 MySQL 版本时,会弹出以下警告。您可以忽略这些警告,并选择不再提示:
-
如果您使用 StarRocks 容器中的 MySQL Client,需要从包含
docker-compose.yml文件的路径运行以下命令。docker compose exec starrocks-fe \
mysql -P 9030 -h 127.0.0.1 -u root --prompt="StarRocks > "StarRocks > -
如果您使用其他客户端,请打开客户端并连接至 StarRocks。
创建 External Catalog
您可以通过创建 External Catalog 将 StarRocks 连接至您的数据湖。以下示例基于以上 Iceberg 数据源创建 External Catalog。具体配置内容将在示例后详细解释。
CREATE EXTERNAL CATALOG 'iceberg'
COMMENT "External catalog to Apache Iceberg on MinIO"
PROPERTIES
(
  "type"="iceberg",
  "iceberg.catalog.type"="rest",
  "iceberg.catalog.uri"="http://iceberg-rest:8181",
  "iceberg.catalog.warehouse"="warehouse",
  "aws.s3.access_key"="admin",
  "aws.s3.secret_key"="password",
  "aws.s3.endpoint"="http://minio:9000",
  "aws.s3.enable_path_style_access"="true",
  "client.factory"="com.starrocks.connector.iceberg.IcebergAwsClientFactory"
);
PROPERTIES
| 属性 | 描述 |
|---|---|
type | 数据源的类型,此示例中为 iceberg。 |
iceberg.catalog.type | Iceberg 集群所使用的元数据服务的类型,此示例中为 rest。 |
iceberg.catalog.uri | REST 服务器的 URI。 |
iceberg.catalog.warehouse | Catalog 的仓库位置或标志符。在此示例中,Compose 文件中指定的仓库名称为 warehouse。 |
aws.s3.access_key | MinIO Access Key。在此示例中,Compose 文件中设置 Access Key 为 admin。 |
aws.s3.secret_key | MinIO Secret Key。在此示例中,Compose 文件中设置 Secret Key 为 password。 |
aws.s3.endpoint | MinIO 端点。 |
aws.s3.enable_path_style_access | 是否开启路径类型访问 (Path-Style Access)。使用 MinIO 作为对象存储时,该项为必填。 |
client.factory | 此示例中使用 iceberg.IcebergAwsClientFactory。aws.s3.access_key 和 aws.s3.secret_key 参数进行身份验证。 |
创建成功后,运行以下命令查看创建的 Catalog。
SHOW CATALOGS;
返回:
+-----------------+----------+------------------------------------------------------------------+
| Catalog         | Type     | Comment                                                          |
+-----------------+----------+------------------------------------------------------------------+
| default_catalog | Internal | An internal catalog contains this cluster's self-managed tables. |
| iceberg         | Iceberg  | External catalog to Apache Iceberg on MinIO                      |
+-----------------+----------+------------------------------------------------------------------+
2 rows in set (0.03 sec)
其中 default_catalog 为 StarRocks 的 Internal Catalog,用于存储内部数据。
设置当前使用的 Catalog 为 iceberg。
SET CATALOG iceberg;
查看 iceberg 中的数据库。
SHOW DATABASES;
+----------+
| Database |
+----------+
| nyc      |
+----------+
1 row in set (0.07 sec)
此时返回的数据库即为先前在 PySpark Session 中创建的数据库。当您添加了 iceberg Catalog 后,便可以在 StarRocks 中看到 nyc 数据库。
切换至 nyc 数据库。
USE nyc;
返回:
Reading table information for completion of table and column names
You can turn off this feature to get a quicker startup with -A

Database changed
查看 nyc 数据库中的表。
SHOW TABLES;
返回:
+---------------+
| Tables_in_nyc |
+---------------+
| greentaxis    |
+---------------+
1 rows in set (0.05 sec)
查看 greentaxis 表的 Schema。
DESCRIBE greentaxis;
返回:
+-----------------------+------------------+------+-------+---------+-------+
| Field                 | Type             | Null | Key   | Default | Extra |
+-----------------------+------------------+------+-------+---------+-------+
| VendorID              | INT              | Yes  | false | NULL    |       |
| lpep_pickup_datetime  | DATETIME         | Yes  | false | NULL    |       |
| lpep_dropoff_datetime | DATETIME         | Yes  | false | NULL    |       |
| store_and_fwd_flag    | VARCHAR(1048576) | Yes  | false | NULL    |       |
| RatecodeID            | BIGINT           | Yes  | false | NULL    |       |
| PULocationID          | INT              | Yes  | false | NULL    |       |
| DOLocationID          | INT              | Yes  | false | NULL    |       |
| passenger_count       | BIGINT           | Yes  | false | NULL    |       |
| trip_distance         | DOUBLE           | Yes  | false | NULL    |       |
| fare_amount           | DOUBLE           | Yes  | false | NULL    |       |
| extra                 | DOUBLE           | Yes  | false | NULL    |       |
| mta_tax               | DOUBLE           | Yes  | false | NULL    |       |
| tip_amount            | DOUBLE           | Yes  | false | NULL    |       |
| tolls_amount          | DOUBLE           | Yes  | false | NULL    |       |
| ehail_fee             | DOUBLE           | Yes  | false | NULL    |       |
| improvement_surcharge | DOUBLE           | Yes  | false | NULL    |       |
| total_amount          | DOUBLE           | Yes  | false | NULL    |       |
| payment_type          | BIGINT           | Yes  | false | NULL    |       |
| trip_type             | BIGINT           | Yes  | false | NULL    |       |
| congestion_surcharge  | DOUBLE           | Yes  | false | NULL    |       |
+-----------------------+------------------+------+-------+---------+-------+
20 rows in set (0.04 sec)
通过比较 StarRocks 返回的 Schema 与之前 PySpark 会话中的 df.printSchema() 的 Schema,可以发现 Spark 中的 timestamp_ntz 数据类型在 StarRocks 中表示为 DATETIME。除此之外还有其他 Schema 转换。
使用 StarRocks 查询 Iceberg
查询接单时间
以下语句查询出租车接单时间,仅返回前十行数据。
SELECT lpep_pickup_datetime FROM greentaxis LIMIT 10;
返回:
+----------------------+
| lpep_pickup_datetime |
+----------------------+
| 2023-05-01 00:52:10  |
| 2023-05-01 00:29:49  |
| 2023-05-01 00:25:19  |
| 2023-05-01 00:07:06  |
| 2023-05-01 00:43:31  |
| 2023-05-01 00:51:54  |
| 2023-05-01 00:27:46  |
| 2023-05-01 00:27:14  |
| 2023-05-01 00:24:14  |
| 2023-05-01 00:46:55  |
+----------------------+
10 rows in set (0.07 sec)
查询接单高峰时期
以下查询按每小时聚合行程数据,计算每小时接单的数量。
SELECT COUNT(*) AS trips,
       hour(lpep_pickup_datetime) AS hour_of_day
FROM greentaxis
GROUP BY hour_of_day
ORDER BY trips DESC;
结果显示一天中最繁忙的时间段是 18:00。
+-------+-------------+
| trips | hour_of_day |
+-------+-------------+
|  5381 |          18 |
|  5253 |          17 |
|  5091 |          16 |
|  4736 |          15 |
|  4393 |          14 |
|  4275 |          19 |
|  3893 |          12 |
|  3816 |          11 |
|  3685 |          13 |
|  3616 |           9 |
|  3530 |          10 |
|  3361 |          20 |
|  3315 |           8 |
|  2917 |          21 |
|  2680 |           7 |
|  2322 |          22 |
|  1735 |          23 |
|  1202 |           6 |
|  1189 |           0 |
|   806 |           1 |
|   606 |           2 |
|   513 |           3 |
|   451 |           5 |
|   408 |           4 |
+-------+-------------+
24 rows in set (0.08 sec)
总结
本教程旨在展示如何使用 StarRocks External Catalog,并查询 Iceberg Catalog 中的数据。除 Iceberg 外,您还可以通过 StarRocks 集成 Hive、Hudi、Delta Lake 和 JDBC 等其他数据源。
在本教程中,您:
- 在 Docker 中部署了 StarRocks、Iceberg、PySpark 和 MinIO 环境
- 将纽约市出租车数据导入至 Iceberg 数据湖中
- 配置了 StarRocks External Catalog,以访问 Iceberg 中的数据
- 在 StarRocks 中查询数据湖中的数据
更多信息
- StarRocks Catalog
- Apache Iceberg 文档 和 快速入门(包括 PySpark)
- 绿色出租车行程记录数据集由纽约市提供,受到以下使用条款和隐私政策的约束。
