Load data from cloud storage
StarRocks supports using one of the following methods to load huge amounts of data from cloud storage: Broker Load and INSERT.
In v3.0 and earlier, StarRocks only supports Broker Load, which runs in asynchronous loading mode. After you submit a load job, StarRocks asynchronously runs the job. You can use SELECT * FROM information_schema.loads to query the job result. This feature is supported from v3.1 onwards. For more information, see the "View a load job" section of this topic.
Broker Load ensures the transactional atomicity of each load job that is run to load multiple data files, which means that the loading of multiple data files in one load job must all succeed or fail. It never happens that the loading of some data files succeeds while the loading of the other files fails.
Additionally, Broker Load supports data transformation at data loading and supports data changes made by UPSERT and DELETE operations during data loading. For more information, see Transform data at loading and Change data through loading.
You can load data into StarRocks tables only as a user who has the INSERT privilege on those StarRocks tables. If you do not have the INSERT privilege, follow the instructions provided in GRANT to grant the INSERT privilege to the user that you use to connect to your StarRocks cluster.
From v3.1 onwards, StarRocks supports directly loading the data of Parquet-formatted or ORC-formatted files from AWS S3 by using the INSERT command and the FILES keyword, saving you from the trouble of creating an external table first. For more information, see INSERT > Insert data directly from files in an external source using FILES keyword.
This topic focuses on using Broker Load to load data from cloud storage.
Supported data file formats
Broker Load supports the following data file formats:
-
CSV
-
Parquet
-
ORC
-
JSON (supported from v3.2.3 onwards)
NOTE
For CSV data, take note of the following points:
- You can use a UTF-8 string, such as a comma (,), tab, or pipe (|), whose length does not exceed 50 bytes as a text delimiter.
- Null values are denoted by using
\N. For example, a data file consists of three columns, and a record from that data file holds data in the first and third columns but no data in the second column. In this situation, you need to use\Nin the second column to denote a null value. This means the record must be compiled asa,\N,binstead ofa,,b.a,,bdenotes that the second column of the record holds an empty string.
How it works
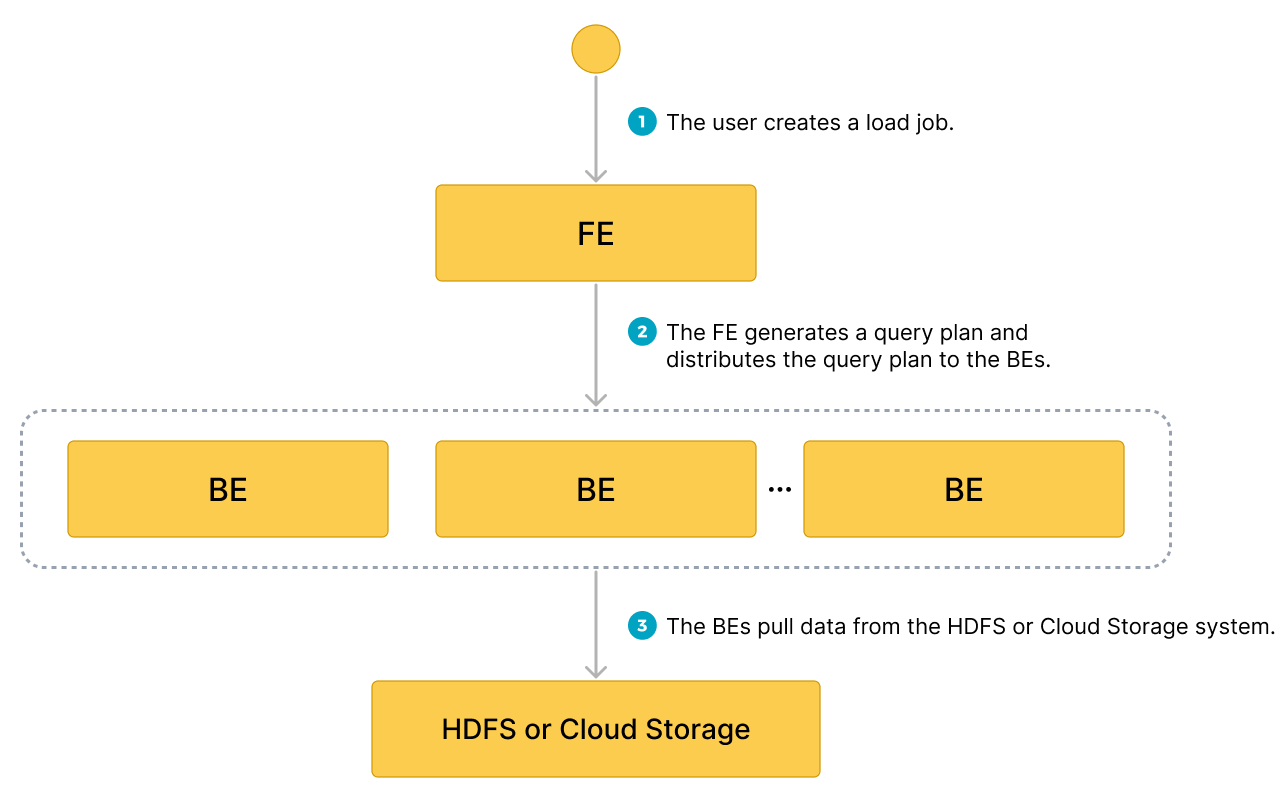
After you submit a load job to an FE, the FE generates a query plan, splits the query plan into portions based on the number of available BEs or CNs and the size of the data file you want to load, and then assigns each portion of the query plan to an available BE or CN. During the load, each involved BE or CN pulls the data of the data file from your external storage system, pre-processes the data, and then loads the data into your StarRocks cluster. After all BEs or CNs finish their portions of the query plan, the FE determines whether the load job is successful.
The following figure shows the workflow of a Broker Load job.
Prepare data examples
-
Log in to your local file system and create two CSV-formatted data files,
file1.csvandfile2.csv. Both files consist of three columns, which represent user ID, user name, and user score in sequence.-
file1.csv1,Lily,21
2,Rose,22
3,Alice,23
4,Julia,24 -
file2.csv5,Tony,25
6,Adam,26
7,Allen,27
8,Jacky,28
-
-
Upload
file1.csvandfile2.csvto theinputfolder of your AWS S3 bucketbucket_s3, to theinputfolder of your Google GCS bucketbucket_gcs, to theinputfolder of your S3-compatible storage object (such as MinIO) bucketbucket_minio, and to the specified paths of your Azure Storage. -
Log in to your StarRocks database (for example,
test_db) and create two Primary Key tables,table1andtable2. Both tables consist of three columns:id,name, andscore, of whichidis the primary key.CREATE TABLE `table1`
(
`id` int(11) NOT NULL COMMENT "user ID",
`name` varchar(65533) NULL DEFAULT "" COMMENT "user name",
`score` int(11) NOT NULL DEFAULT "0" COMMENT "user score"
)
ENGINE=OLAP
PRIMARY KEY(`id`)
DISTRIBUTED BY HASH(`id`);
CREATE TABLE `table2`
(
`id` int(11) NOT NULL COMMENT "user ID",
`name` varchar(65533) NULL DEFAULT "" COMMENT "user name",
`score` int(11) NOT NULL DEFAULT "0" COMMENT "user score"
)
ENGINE=OLAP
PRIMARY KEY(`id`)
DISTRIBUTED BY HASH(`id`);
Load data from AWS S3
Note that Broker Load supports accessing AWS S3 according to the S3 or S3A protocol. Therefore, when you load data from AWS S3, you can include s3:// or s3a:// as the prefix in the S3 URI that you pass as the file path (DATA INFILE).
Also, note that the following examples use the CSV file format and the instance profile-based authentication method. For information about how to load data in other formats and about the authentication parameters that you need to configure when using other authentication methods, see BROKER LOAD.
Load a single data file into a single table
Example
Execute the following statement to load the data of file1.csv stored in the input folder of your AWS S3 bucket bucket_s3 into table1:
LOAD LABEL test_db.label_brokerloadtest_101
(
    DATA INFILE("s3a://bucket_s3/input/file1.csv")
    INTO TABLE table1
    COLUMNS TERMINATED BY ","
    (id, name, score)
)
WITH BROKER
(
    "aws.s3.use_instance_profile" = "true",
    "aws.s3.region" = "<aws_s3_region>"
)
PROPERTIES
(
    "timeout" = "3600"
);
Query data
After you submit the load job, you can use SELECT * FROM information_schema.loads to query the job result. This feature is supported from v3.1 onwards. For more information, see the "View a load job" section of this topic.
After you confirm that the load job is successful, you can use SELECT to query the data of table1:
SELECT * FROM table1;
+------+-------+-------+
| id   | name  | score |
+------+-------+-------+
|    1 | Lily  |    21 |
|    2 | Rose  |    22 |
|    3 | Alice |    23 |
|    4 | Julia |    24 |
+------+-------+-------+
4 rows in set (0.01 sec)
Load multiple data files into a single table
Example
Execute the following statement to load the data of all data files (file1.csv and file2.csv) stored in the input folder of your AWS S3 bucket bucket_s3 into table1:
LOAD LABEL test_db.label_brokerloadtest_102
(
    DATA INFILE("s3a://bucket_s3/input/*")
    INTO TABLE table1
    COLUMNS TERMINATED BY ","
    (id, name, score)
)
WITH BROKER
(
    "aws.s3.use_instance_profile" = "true",
    "aws.s3.region" = "<aws_s3_region>"
)
PROPERTIES
(
    "timeout" = "3600"
);
Query data
After you submit the load job, you can use SELECT * FROM information_schema.loads to query the job result. This feature is supported from v3.1 onwards. For more information, see the "View a load job" section of this topic.
After you confirm that the load job is successful, you can use SELECT to query the data of table1:
SELECT * FROM table1;
+------+-------+-------+
| id   | name  | score |
+------+-------+-------+
|    1 | Lily  |    21 |
|    2 | Rose  |    22 |
|    3 | Alice |    23 |
|    4 | Julia |    24 |
|    5 | Tony  |    25 |
|    6 | Adam  |    26 |
|    7 | Allen |    27 |
|    8 | Jacky |    28 |
+------+-------+-------+
4 rows in set (0.01 sec)
Load multiple data files into multiple tables
Example
Execute the following statement to load the data of file1.csv and file2.csv stored in the input folder of your AWS S3 bucket bucket_s3 into table1 and table2, respectively:
LOAD LABEL test_db.label_brokerloadtest_103
(
    DATA INFILE("s3a://bucket_s3/input/file1.csv")
    INTO TABLE table1
    COLUMNS TERMINATED BY ","
    (id, name, score)
    ,
    DATA INFILE("s3a://bucket_s3/input/file2.csv")
    INTO TABLE table2
    COLUMNS TERMINATED BY ","
    (id, name, score)
)
WITH BROKER
(
    "aws.s3.use_instance_profile" = "true",
    "aws.s3.region" = "<aws_s3_region>"
)
PROPERTIES
(
    "timeout" = "3600"
);
Query data
After you submit the load job, you can use SELECT * FROM information_schema.loads to query the job result. This feature is supported from v3.1 onwards. For more information, see the "View a load job" section of this topic.
After you confirm that the load job is successful, you can use SELECT to query the data of table1 and table2:
-
Query
table1:SELECT * FROM table1;
+------+-------+-------+
| id | name | score |
+------+-------+-------+
| 1 | Lily | 21 |
| 2 | Rose | 22 |
| 3 | Alice | 23 |
| 4 | Julia | 24 |
+------+-------+-------+
4 rows in set (0.01 sec) -
Query
table2:SELECT * FROM table2;
+------+-------+-------+
| id | name | score |
+------+-------+-------+
| 5 | Tony | 25 |
| 6 | Adam | 26 |
| 7 | Allen | 27 |
| 8 | Jacky | 28 |
+------+-------+-------+
4 rows in set (0.01 sec)
Load data from Google GCS
Note that Broker Load supports accessing Google GCS only according to the gs protocol. Therefore, when you load data from Google GCS, you must include gs:// as the prefix in the GCS URI that you pass as the file path (DATA INFILE).
Also, note that the following examples use the CSV file format and the VM-based authentication method. For information about how to load data in other formats and about the authentication parameters that you need to configure when using other authentication methods, see BROKER LOAD.
Load a single data file into a single table
Example
Execute the following statement to load the data of file1.csv stored in the input folder of your Google GCS bucket bucket_gcs into table1:
LOAD LABEL test_db.label_brokerloadtest_201
(
DATA INFILE("gs://bucket_gcs/input/file1.csv")
INTO TABLE table1
COLUMNS TERMINATED BY ","
(id, name, score)
)
WITH BROKER
(
"gcp.gcs.use_compute_engine_service_account" = "true"
)
PROPERTIES
(
"timeout" = "3600"
);
Query data
After you submit the load job, you can use SELECT * FROM information_schema.loads to query the job result. This feature is supported from v3.1 onwards. For more information, see the "View a load job" section of this topic.
After you confirm that the load job is successful, you can use SELECT to query the data of table1:
SELECT * FROM table1;
+------+-------+-------+
| id   | name  | score |
+------+-------+-------+
|    1 | Lily  |    21 |
|    2 | Rose  |    22 |
|    3 | Alice |    23 |
|    4 | Julia |    24 |
+------+-------+-------+
4 rows in set (0.01 sec)
Load multiple data files into a single table
Example
Execute the following statement to load the data of all data files (file1.csv and file2.csv) stored in the input folder of your Google GCS bucket bucket_gcs into table1:
LOAD LABEL test_db.label_brokerloadtest_202
(
DATA INFILE("gs://bucket_gcs/input/*")
INTO TABLE table1
COLUMNS TERMINATED BY ","
(id, name, score)
)
WITH BROKER
(
"gcp.gcs.use_compute_engine_service_account" = "true"
)
PROPERTIES
(
"timeout" = "3600"
);
Query data
After you submit the load job, you can use SELECT * FROM information_schema.loads to query the job result. This feature is supported from v3.1 onwards. For more information, see the "View a load job" section of this topic.
After you confirm that the load job is successful, you can use SELECT to query the data of table1:
SELECT * FROM table1;
+------+-------+-------+
| id | name | score |
+------+-------+-------+
| 1 | Lily | 21 |
| 2 | Rose | 22 |
| 3 | Alice | 23 |
| 4 | Julia | 24 |
| 5 | Tony | 25 |
| 6 | Adam | 26 |
| 7 | Allen | 27 |
| 8 | Jacky | 28 |
+------+-------+-------+
4 rows in set (0.01 sec)
Load multiple data files into multiple tables
Example
Execute the following statement to load the data of file1.csv and file2.csv stored in the input folder of your Google GCS bucket bucket_gcs into table1 and table2, respectively:
LOAD LABEL test_db.label_brokerloadtest_203
(
DATA INFILE("gs://bucket_gcs/input/file1.csv")
INTO TABLE table1
COLUMNS TERMINATED BY ","
(id, name, score)
,
DATA INFILE("gs://bucket_gcs/input/file2.csv")
INTO TABLE table2
COLUMNS TERMINATED BY ","
(id, name, score)
)
WITH BROKER
(
"gcp.gcs.use_compute_engine_service_account" = "true"
);
PROPERTIES
(
"timeout" = "3600"
);
Query data
After you submit the load job, you can use SELECT * FROM information_schema.loads to query the job result. This feature is supported from v3.1 onwards. For more information, see the "View a load job" section of this topic.
After you confirm that the load job is successful, you can use SELECT to query the data of table1 and table2:
-
Query
table1:SELECT * FROM table1;
+------+-------+-------+
| id | name | score |
+------+-------+-------+
| 1 | Lily | 21 |
| 2 | Rose | 22 |
| 3 | Alice | 23 |
| 4 | Julia | 24 |
+------+-------+-------+
4 rows in set (0.01 sec) -
Query
table2:SELECT * FROM table2;
+------+-------+-------+
| id | name | score |
+------+-------+-------+
| 5 | Tony | 25 |
| 6 | Adam | 26 |
| 7 | Allen | 27 |
| 8 | Jacky | 28 |
+------+-------+-------+
4 rows in set (0.01 sec)
Load data from Microsoft Azure Storage
Note that when you load data from Azure Storage, you need to determine which prefix to use based on the access protocol and specific storage service that you use:
- When you load data from Blob Storage, you must include
wasb://orwasbs://as a prefix in the file path (DATA INFILE) based on the protocol that is used to access your storage account:- If your Blob Storage allows access only through HTTP, use
wasb://as the prefix, for example,wasb://<container>@<storage_account>.blob.core.windows.net/<path>/<file_name>/*. - If your Blob Storage allows access only through HTTPS, use
wasbs://as the prefix, for example,wasbs://<container>@<storage_account>.blob.core.windows``.net/<path>/<file_name>/*
- If your Blob Storage allows access only through HTTP, use
- When you load data from Data Lake Storage Gen1, you must include
adl://as a prefix in the file path (DATA INFILE), for example,adl://<data_lake_storage_gen1_name>.azuredatalakestore.net/<path>/<file_name>. - When you load data from Data Lake Storage Gen2, you must include
abfs://orabfss://as a prefix in the file path (DATA INFILE) based on the protocol that is used to access your storage account:- If your Data Lake Storage Gen2 allows access only via HTTP, use
abfs://as the prefix, for example,abfs://<container>@<storage_account>.dfs.core.windows.net/<file_name>. - If your Data Lake Storage Gen2 allows access only via HTTPS, use
abfss://as the prefix, for example,abfss://<container>@<storage_account>.dfs.core.windows.net/<file_name>.
- If your Data Lake Storage Gen2 allows access only via HTTP, use
Also, note that the following examples use the CSV file format, Azure Blob Storage, and the shared key-based authentication method. For information about how to load data in other formats and about the authentication parameters that you need to configure when using other Azure storage services and authentication methods, see BROKER LOAD.
Load a single data file into a single table
Example
Execute the following statement to load the data of file1.csv stored in the specified path of your Azure Storage into table1:
LOAD LABEL test_db.label_brokerloadtest_301
(
DATA INFILE("wasb[s]://<container>@<storage_account>.blob.core.windows.net/<path>/file1.csv")
INTO TABLE table1
COLUMNS TERMINATED BY ","
(id, name, score)
)
WITH BROKER
(
"azure.blob.storage_account" = "<blob_storage_account_name>",
"azure.blob.shared_key" = "<blob_storage_account_shared_key>"
)
PROPERTIES
(
"timeout" = "3600"
);
Query data
After you submit the load job, you can use SELECT * FROM information_schema.loads to query the job result. This feature is supported from v3.1 onwards. For more information, see the "View a load job" section of this topic.
After you confirm that the load job is successful, you can use SELECT to query the data of table1:
SELECT * FROM table1;
+------+-------+-------+
| id   | name  | score |
+------+-------+-------+
|    1 | Lily  |    21 |
|    2 | Rose  |    22 |
|    3 | Alice |    23 |
|    4 | Julia |    24 |
+------+-------+-------+
4 rows in set (0.01 sec)
Load multiple data files into a single table
Example
Execute the following statement to load the data of all data files (file1.csv and file2.csv) stored in the specified path of your Azure Storage into table1:
LOAD LABEL test_db.label_brokerloadtest_302
(
DATA INFILE("wasb[s]://<container>@<storage_account>.blob.core.windows.net/<path>/*")
INTO TABLE table1
COLUMNS TERMINATED BY ","
(id, name, score)
)
WITH BROKER
(
"azure.blob.storage_account" = "<blob_storage_account_name>",
"azure.blob.shared_key" = "<blob_storage_account_shared_key>"
)
PROPERTIES
(
"timeout" = "3600"
);
Query data
After you submit the load job, you can use SELECT * FROM information_schema.loads to query the job result. This feature is supported from v3.1 onwards. For more information, see the "View a load job" section of this topic.
After you confirm that the load job is successful, you can use SELECT to query the data of table1:
SELECT * FROM table1;
+------+-------+-------+
| id   | name  | score |
+------+-------+-------+
|    1 | Lily  |    21 |
|    2 | Rose  |    22 |
|    3 | Alice |    23 |
|    4 | Julia |    24 |
|    5 | Tony  |    25 |
|    6 | Adam  |    26 |
|    7 | Allen |    27 |
|    8 | Jacky |    28 |
+------+-------+-------+
4 rows in set (0.01 sec)
Load multiple data files into multiple tables
Example
Execute the following statement to load the data of file1.csv and file2.csv stored in the specified path of your Azure Storage into table1 and table2, respectively:
LOAD LABEL test_db.label_brokerloadtest_303
(
DATA INFILE("wasb[s]://<container>@<storage_account>.blob.core.windows.net/<path>/file1.csv")
INTO TABLE table1
COLUMNS TERMINATED BY ","
(id, name, score)
,
DATA INFILE("wasb[s]://<container>@<storage_account>.blob.core.windows.net/<path>/file2.csv")
INTO TABLE table2
COLUMNS TERMINATED BY ","
(id, name, score)
)
WITH BROKER
(
"azure.blob.storage_account" = "<blob_storage_account_name>",
"azure.blob.shared_key" = "<blob_storage_account_shared_key>"
);
PROPERTIES
(
"timeout" = "3600"
);
Query data
After you submit the load job, you can use SELECT * FROM information_schema.loads to query the job result. This feature is supported from v3.1 onwards. For more information, see the "View a load job" section of this topic.
After you confirm that the load job is successful, you can use SELECT to query the data of table1 and table2:
-
Query
table1:SELECT * FROM table1;
+------+-------+-------+
| id | name | score |
+------+-------+-------+
| 1 | Lily | 21 |
| 2 | Rose | 22 |
| 3 | Alice | 23 |
| 4 | Julia | 24 |
+------+-------+-------+
4 rows in set (0.01 sec) -
Query
table2:SELECT * FROM table2;
+------+-------+-------+
| id | name | score |
+------+-------+-------+
| 5 | Tony | 25 |
| 6 | Adam | 26 |
| 7 | Allen | 27 |
| 8 | Jacky | 28 |
+------+-------+-------+
4 rows in set (0.01 sec)
Load data from an S3-compatible storage system
The following examples use the CSV file format and the MinIO storage system. For information about how to load data in other formats, see BROKER LOAD.
Load a single data file into a single table
Example
Execute the following statement to load the data of file1.csv stored in the input folder of your MinIO bucket bucket_minio into table1:
LOAD LABEL test_db.label_brokerloadtest_401
(
DATA INFILE("s3://bucket_minio/input/file1.csv")
INTO TABLE table1
COLUMNS TERMINATED BY ","
(id, name, score)
)
WITH BROKER
(
"aws.s3.enable_ssl" = "false",
"aws.s3.enable_path_style_access" = "true",
"aws.s3.endpoint" = "<s3_endpoint>",
"aws.s3.access_key" = "<iam_user_access_key>",
"aws.s3.secret_key" = "<iam_user_secret_key>"
)
PROPERTIES
(
"timeout" = "3600"
);
Query data
After you submit the load job, you can use SELECT * FROM information_schema.loads to query the job result. This feature is supported from v3.1 onwards. For more information, see the "View a load job" section of this topic.
After you confirm that the load job is successful, you can use SELECT to query the data of table1:
SELECT * FROM table1;
+------+-------+-------+
| id   | name  | score |
+------+-------+-------+
|    1 | Lily  |    21 |
|    2 | Rose  |    22 |
|    3 | Alice |    23 |
|    4 | Julia |    24 |
+------+-------+-------+
4 rows in set (0.01 sec)
Load multiple data files into a single table
Example
Execute the following statement to load the data of all data files (file1.csv and file2.csv) stored in the input folder of your MinIO bucket bucket_minio into table1:
LOAD LABEL test_db.label_brokerloadtest_402
(
DATA INFILE("s3://bucket_minio/input/*")
INTO TABLE table1
COLUMNS TERMINATED BY ","
(id, name, score)
)
WITH BROKER
(
"aws.s3.enable_ssl" = "false",
"aws.s3.enable_path_style_access" = "true",
"aws.s3.endpoint" = "<s3_endpoint>",
"aws.s3.access_key" = "<iam_user_access_key>",
"aws.s3.secret_key" = "<iam_user_secret_key>"
)
PROPERTIES
(
"timeout" = "3600"
);
Query data
After you submit the load job, you can use SELECT * FROM information_schema.loads to query the job result. This feature is supported from v3.1 onwards. For more information, see the "View a load job" section of this topic.
After you confirm that the load job is successful, you can use SELECT to query the data of table1:
SELECT * FROM table1;
+------+-------+-------+
| id   | name  | score |
+------+-------+-------+
|    1 | Lily  |    21 |
|    2 | Rose  |    22 |
|    3 | Alice |    23 |
|    4 | Julia |    24 |
|    5 | Tony  |    25 |
|    6 | Adam  |    26 |
|    7 | Allen |    27 |
|    8 | Jacky |    28 |
+------+-------+-------+
4 rows in set (0.01 sec)
Load multiple data files into multiple tables
Example
Execute the following statement to load the data of all data files (file1.csv and file2.csv) stored in the input folder of your MinIO bucket bucket_minio into table1 and table2, respectively:
LOAD LABEL test_db.label_brokerloadtest_403
(
    DATA INFILE("s3://bucket_minio/input/file1.csv")
    INTO TABLE table1
    COLUMNS TERMINATED BY ","
    (id, name, score)
    ,
    DATA INFILE("s3://bucket_minio/input/file2.csv")
    INTO TABLE table2
    COLUMNS TERMINATED BY ","
    (id, city)
)
WITH BROKER
(
    "aws.s3.enable_ssl" = "false",
    "aws.s3.enable_path_style_access" = "true",
    "aws.s3.endpoint" = "<s3_endpoint>",
    "aws.s3.access_key" = "<iam_user_access_key>",
    "aws.s3.secret_key" = "<iam_user_secret_key>"
);
PROPERTIES
(
    "timeout" = "3600"
);
Query data
After you submit the load job, you can use SELECT * FROM information_schema.loads to query the job result. This feature is supported from v3.1 onwards. For more information, see the "View a load job" section of this topic.
After you confirm that the load job is successful, you can use SELECT to query the data of table1 and table2:
-
Query
table1:SELECT * FROM table1;
+------+-------+-------+
| id | name | score |
+------+-------+-------+
| 1 | Lily | 21 |
| 2 | Rose | 22 |
| 3 | Alice | 23 |
| 4 | Julia | 24 |
+------+-------+-------+
4 rows in set (0.01 sec) -
Query
table2:SELECT * FROM table2;
+------+-------+-------+
| id | name | score |
+------+-------+-------+
| 5 | Tony | 25 |
| 6 | Adam | 26 |
| 7 | Allen | 27 |
| 8 | Jacky | 28 |
+------+-------+-------+
4 rows in set (0.01 sec)
View a load job
Use the SELECT statement to query the results of one or more load jobs from the loads table in the information_schema database. This feature is supported from v3.1 onwards.
Example 1: Query the results of load jobs executed on the test_db database. In the query statement, specify that a maximum of two results can be returned and the return results must be sorted by creation time (CREATE_TIME) in descending order.
SELECT * FROM information_schema.loads
WHERE database_name = 'test_db'
ORDER BY create_time DESC
LIMIT 2\G
The following results are returned:
*************************** 1. row ***************************
              JOB_ID: 20686
               LABEL: label_brokerload_unqualifiedtest_83
       DATABASE_NAME: test_db
               STATE: FINISHED
            PROGRESS: ETL:100%; LOAD:100%
                TYPE: BROKER
            PRIORITY: NORMAL
           SCAN_ROWS: 8
       FILTERED_ROWS: 0
     UNSELECTED_ROWS: 0
           SINK_ROWS: 8
            ETL_INFO:
           TASK_INFO: resource:N/A; timeout(s):14400; max_filter_ratio:1.0
         CREATE_TIME: 2023-08-02 15:25:22
      ETL_START_TIME: 2023-08-02 15:25:24
     ETL_FINISH_TIME: 2023-08-02 15:25:24
     LOAD_START_TIME: 2023-08-02 15:25:24
    LOAD_FINISH_TIME: 2023-08-02 15:25:27
         JOB_DETAILS: {"All backends":{"77fe760e-ec53-47f7-917d-be5528288c08":[10006],"0154f64e-e090-47b7-a4b2-92c2ece95f97":[10005]},"FileNumber":2,"FileSize":84,"InternalTableLoadBytes":252,"InternalTableLoadRows":8,"ScanBytes":84,"ScanRows":8,"TaskNumber":2,"Unfinished backends":{"77fe760e-ec53-47f7-917d-be5528288c08":[],"0154f64e-e090-47b7-a4b2-92c2ece95f97":[]}}
           ERROR_MSG: NULL
        TRACKING_URL: NULL
        TRACKING_SQL: NULL
REJECTED_RECORD_PATH: NULL
*************************** 2. row ***************************
              JOB_ID: 20624
               LABEL: label_brokerload_unqualifiedtest_82
       DATABASE_NAME: test_db
               STATE: FINISHED
            PROGRESS: ETL:100%; LOAD:100%
                TYPE: BROKER
            PRIORITY: NORMAL
           SCAN_ROWS: 12
       FILTERED_ROWS: 4
     UNSELECTED_ROWS: 0
           SINK_ROWS: 8
            ETL_INFO:
           TASK_INFO: resource:N/A; timeout(s):14400; max_filter_ratio:1.0
         CREATE_TIME: 2023-08-02 15:23:29
      ETL_START_TIME: 2023-08-02 15:23:34
     ETL_FINISH_TIME: 2023-08-02 15:23:34
     LOAD_START_TIME: 2023-08-02 15:23:34
    LOAD_FINISH_TIME: 2023-08-02 15:23:34
         JOB_DETAILS: {"All backends":{"78f78fc3-8509-451f-a0a2-c6b5db27dcb6":[10010],"a24aa357-f7de-4e49-9e09-e98463b5b53c":[10006]},"FileNumber":2,"FileSize":158,"InternalTableLoadBytes":333,"InternalTableLoadRows":8,"ScanBytes":158,"ScanRows":12,"TaskNumber":2,"Unfinished backends":{"78f78fc3-8509-451f-a0a2-c6b5db27dcb6":[],"a24aa357-f7de-4e49-9e09-e98463b5b53c":[]}}
           ERROR_MSG: NULL
        TRACKING_URL: http://172.26.195.69:8540/api/_load_error_log?file=error_log_78f78fc38509451f_a0a2c6b5db27dcb7
        TRACKING_SQL: select tracking_log from information_schema.load_tracking_logs where job_id=20624
REJECTED_RECORD_PATH: 172.26.95.92:/home/disk1/sr/be/storage/rejected_record/test_db/label_brokerload_unqualifiedtest_0728/6/404a20b1e4db4d27_8aa9af1e8d6d8bdc
Example 2: Query the result of the load job (whose label is label_brokerload_unqualifiedtest_82) executed on the test_db database:
SELECT * FROM information_schema.loads
WHERE database_name = 'test_db' and label = 'label_brokerload_unqualifiedtest_82'\G
The following result is returned:
*************************** 1. row ***************************
              JOB_ID: 20624
               LABEL: label_brokerload_unqualifiedtest_82
       DATABASE_NAME: test_db
               STATE: FINISHED
            PROGRESS: ETL:100%; LOAD:100%
                TYPE: BROKER
            PRIORITY: NORMAL
           SCAN_ROWS: 12
       FILTERED_ROWS: 4
     UNSELECTED_ROWS: 0
           SINK_ROWS: 8
            ETL_INFO:
           TASK_INFO: resource:N/A; timeout(s):14400; max_filter_ratio:1.0
         CREATE_TIME: 2023-08-02 15:23:29
      ETL_START_TIME: 2023-08-02 15:23:34
     ETL_FINISH_TIME: 2023-08-02 15:23:34
     LOAD_START_TIME: 2023-08-02 15:23:34
    LOAD_FINISH_TIME: 2023-08-02 15:23:34
         JOB_DETAILS: {"All backends":{"78f78fc3-8509-451f-a0a2-c6b5db27dcb6":[10010],"a24aa357-f7de-4e49-9e09-e98463b5b53c":[10006]},"FileNumber":2,"FileSize":158,"InternalTableLoadBytes":333,"InternalTableLoadRows":8,"ScanBytes":158,"ScanRows":12,"TaskNumber":2,"Unfinished backends":{"78f78fc3-8509-451f-a0a2-c6b5db27dcb6":[],"a24aa357-f7de-4e49-9e09-e98463b5b53c":[]}}
           ERROR_MSG: NULL
        TRACKING_URL: http://172.26.195.69:8540/api/_load_error_log?file=error_log_78f78fc38509451f_a0a2c6b5db27dcb7
        TRACKING_SQL: select tracking_log from information_schema.load_tracking_logs where job_id=20624
REJECTED_RECORD_PATH: 172.26.95.92:/home/disk1/sr/be/storage/rejected_record/test_db/label_brokerload_unqualifiedtest_0728/6/404a20b1e4db4d27_8aa9af1e8d6d8bdc
For information about the fields in the return results, see Information Schema > loads.
Cancel a load job
When a load job is not in the CANCELLED or FINISHED stage, you can use the CANCEL LOAD statement to cancel the job.
For example, you can execute the following statement to cancel a load job, whose label is label1, in the database test_db:
CANCEL LOAD
FROM test_db
WHERE LABEL = "label1";
Job splitting and concurrent running
A Broker Load job can be split into one or more tasks that concurrently run. The tasks within a load job are run within a single transaction. They must all succeed or fail. StarRocks splits each load job based on how you declare data_desc in the LOAD statement:
-
If you declare multiple
data_descparameters, each of which specifies a distinct table, a task is generated to load the data of each table. -
If you declare multiple
data_descparameters, each of which specifies a distinct partition for the same table, a task is generated to load the data of each partition.
Additionally, each task can be further split into one or more instances, which are evenly distributed to and concurrently run on the BEs or CNs of your StarRocks cluster. StarRocks splits each task based on the FE parameter min_bytes_per_broker_scanner and the number of BE or CN nodes. You can use the following formula to calculate the number of instances in an individual task:
Number of instances in an individual task = min(Amount of data to be loaded by an individual task/min_bytes_per_broker_scanner, Number of BE/CN nodes)
In most cases, only one data_desc is declared for each load job, each load job is split into only one task, and the task is split into the same number of instances as the number of BE or CN nodes.
Troubleshooting
See Broker Load FAQ.